In this chapter the AWSACtools, comprising an ATLAS job system developed especially for AWS, are described in detail. At first, the requirements are derived. Then, the developed job system is described in two detail levels. If you do not understand everything at the first time, then read on. The parts at the end of this chapter (containing voluminous examples) should make things clearer.
Note
There is an extra web page to view and download AWSACtools‘ sources.
In this part, the requirements of the job system are discussed. What possibilities must the job system provide? From the user‘s point of view:
The user is the one starting and controlling jobs with a client software. He must be able to prepare computing jobs of any style with as few as possible restrictions. Therefore he must be able to control the operating system, send any necessary information (input) and to define the results he likes to receive in the end (output). While a job is active, it should be possible to monitor its status.
It has to be possible to start more than one job at the same time: The job system and the client software must provide an easy way to start a whole bunch of jobs - a job session.
So our job system must consist of different necessary components that are introduced here.
Job:
In order to meet the requirements stated above, our definition of a job is the following:
One job is a shell script, executed as root, that runs as its own process on an instance. The script is provided by the user itself. Within this script, the commands of an ATLAS Software Release and any user-given file (input) can be used. Any result files can be defined (output).
The job shell script must be controlled by another process in order to e.g. detect errors, which is important to realize monitoring.
Input:
The job system must be able to deliver various user-given input files that must be accessible from within the job shell script.
Output:
Output files generated by the job shell script must be received by the job system and saved reliable, e.g. on S3. These results must be accessible by the user (the client) in the end.
Status information:
The job should inform the job system about its status in real-time.
Session:
A job session consists of one or more jobs, started by the user at the same time. To realize this, we can use the possibility of EC2 reservations (start more than one EC2 instance at the same time). A job session must be identifiable by a unique ID, the session ID.
Following these requirements, AWSACtools, providing a job system for ATLAS Computing with Amazon Web Services, were developed.
This part describes the developed job system in every detail. The sources of the AWSACtools can be viewed and downloaded here: http://gehrcke.de/awsac/permstuff/AWSACtools/ .
The basic elements of the job system developed are visualized here:
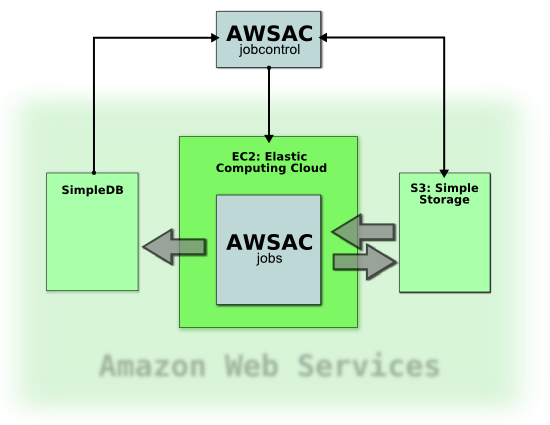
As you can see, three of Amazon Web Services are used: S3, EC2 and SimpleDB.
The job controlling part of the system is the client (AWSAC jobcontrol in the picture). It is commanded by the user. It has the following tasks:
- start job sessions
- deliver input data for jobs
- monitor jobs’ statuses
- receive results and clean up
The input is uploaded to S3, where it is accessible from EC2 instances. S3 is additionally used for delivering an ATLAS Software Release EBS snapshot and to save the output, which can be downloaded from the client later on. Jobs are executed on EC2 instances. They send their status information to SimpleDB. This monitoring information can be fetched instantly using the client machine.
The system is now described again, but one detail level higher.
The job system delivered by AWSACtools consists of various scripts. The main components are shorty introduced here:
- awsac-session (Python): The client with the tasks described above. Can be started in different modi: –-start, –-check, –-getresults and –-cleanup.
- awsac-autorun (shell script): Hard coded into AWSAC AMI; integrated in system start-up - tries to receive session information and initiates long chain of commands.
- awsac-all-instances-autorun (shell script): Delivered within job session input. Can be modified by the user - to make the system very flexible. If it is found by awsac-autorun, it is executed.
- awsac-processjobs (Python): Delivered within job session input (can be modified by the user, too). Executed by awsac-all-instances-autorun. Executes and controls the job shell scripts; manages ATLAS Software Releases (using EBS snapshots and volumes), monitoring information (using SimpleDB) and job output (using S3).
In order to make the system more comprehensible, the next paragraphs will describe the procession of an example job session from the beginning to the end in more detail.
The start process on the client:
Assume the user prepared all necessary job session information. Together this will be the session start info file and the so-called session archive. The former defines things like a short session description, the desired AMI (by means of its ID) and the favoured instance type. The latter contains the job definitions file (described later), the job shell scripts and everything else needed on the instances.
Assume that this session information is given to the client awsac-session --start. When it then starts the desired session, the client at first generates a new session ID. Then it stores the session archive on S3 - using the session ID for S3 key generation.
The session ID and some other selected essential information is put together in a special userdata string (see 4.3.1: userdata string). After accomplishing some checks, the client requests a new EC2 reservation with the favoured AWSAC AMI and instance type, the right number of instances starting up and the constructed userdata string. The right number guarantees that each job shell script of the session just started will get its own virtual core and the userdata string ensures that each instance knows which session it belongs to.
Initialization of the session on the instances:
Instances within this job session are starting up the desired special AWSAC AMI. This AMI contains a modified rc.local, which is executed after the linux system has booted up and initialized. From this rc.local the hardcoded shell script awsac-autorun is executed. This happens on each instance of the AWSAC AMI: it does not make any difference, if the instance is within a job session or not. awsac-autorun tries to receive a userdata string. If it could be received, it is stored in the so-called session information file and the chain of conditional commands goes on with the next steps: parse the string and - using information from the string - receive the session archive from S3 using another small Python script. If one of many conditions is not satisfied, the chain stops. awsac-autorun is the last hard coded element in the chain. Now we leave the domain of pre-defined things: within a successful session, the session archive contains another shell script: awsac-all-instances-autorun - if it is found, it is executed by awsac-autorun.
As you can see, the job system itself is very flexible: it still does not exist! This means that the whole job system - beginning with awsac-all-instances-autorun - can be defined completely by the user. But don’t worry, the job system introduced before was realized (as “an example job system” that can be modified by you using the same AMI).
What do I have to do?
Each instance within the session has downloaded and extracted the session archive. awsac-all-instances-autorun was found and executed. This little shell script is used to initialize the Python program awsac-processjobs, the real worker of the server-sided part of the job system. The information awsac-processjobs must be initialized with is summarized and explained now.
Each job (defined in the job definitions file) should be processed only once. So an instance has to find ans answer on the question «What do I have to do?». It needs a way to distinguish itself from other instances and has to select one or more jobs from the jobs definitions file that is not selected by any other instance in the same session. As explained in the description of EC2 reservations, each instance within a reservation has its own launch index, which is between 0 and N-1; in the case of N launched instances. Hence, the special job(s) selected by one special instance within the session depend on the lauch index and on the number of virtual cores of the instance (each job should get one core for itself).
But how to find out the launch index and the number of cores? The number of cores per instance was set by the client (from the instance type). It was stored in the user data string, which was received by awsac-autorun. It is now stored on the instance in the session information file. Each instance has its own unique instance ID. This one can be fetched from the internal EC2 server at 169.254.169.254 (like receiving userdata string). awsac-all-instances-autorun receives this ID and stores it into the instance ID file. Using the instance ID, every additional information about an instance (like the launch index and e.g. availability zone) can be fetched easily within a Python script, using boto.
Hence, after receiving the instance ID, awsac-all-instances-autorun executes awsac-processjobs with three files as parameters, containing all necessary information: the job definitions file, the session information file and the instance ID file.
Selecting jobs and start processing
Consider one instance within the session. There awsac-processjobs parses the job definitions file, the session information file and the instance ID file. As described above, from this information awsac-processjobs is able to determine the jobs for this considered instance.
The user must define an EBS snapshot ID (see Elastic Block Store) for each job. This makes it possible, to execute different jobs with different ATLAS Release Versions. The snapshot IDs are defined in the job definitions file, too. Hence, when awsac-processjobs knows which jobs have to be executed on this instance, it knows which different EBS snapshots have to be embedded into the system (in form of new EBS volumes). After detecting which ATLAS Software Release snapshots are needed for this instance, awsac-processjobs uses boto to create EBS volumes from these snapshots. It then attaches these volumes to the current instance and mounts them into the file system.
Maybe this won’t happen very often, but this feature makes it possible, that e.g. two different EBS Volumes with two different ATLAS Release Versions are available from one instance with two virtual cores, running two jobs that demanded two different snapshot IDs.
Each job shell script will get its own sub process called by awsac-processjobs. Every sub process gets its own working directory.
Every time the status of a job changes, a SimpleDB domain (the session ID is the name of this domain) for this session will be created/updated using boto. Currently, there are three possible states: running (sub process started), saving (sub process ended, uploading results to S3) and finished. This monitoring information can be retrieved using awsac-session --check. So the user is able to follow the status of all his jobs in the session.
While processing the jobs, stdout and stderr of the job shell scripts are collected into log files. stdout and stderr of awsac-processjobs itself is written to console (console output of an instance is receivable using a special EC2 API call, e.g. with Elasticfox) and into a log file, too.
Monitor status information
As stated above, awsac-session --check (together with the session ID) retrieves the status information set by all awsac-processjobs scripts on the different instances within the session. It gives a convenient overview about states, returncodes, times (start, end, duration, ...) and more of all jobs.
End processing jobs
Assume one special instance with a job shell script sub process just finished. The returncode of the script is written to SimpleDB and if the job shell script created a results.tar.bz2 in its working directory, awsac-processjobs will save it to S3. The log file containing stdout and stderr of the script is compressed and uploaded, too. All these output/results can be received using awsac-session --getresults.
When all the uploading has finished, the EBS volumes will be unmounted, detached and deleted by awsac-processjobs. As a last step the awsac-processjobs log file is bundled and uploaded to S3, too. Finally awsac-processjobs terminates the instance it is running on with an EC2 API call.
Get results
By using awsac-session --getresults together with the session ID, the client will receive all the compressed archives of job results and log files.
Clean up
By using awsac-session --cleanup together with a session ID, the client offers the possibility to delete contents from S3 and/or SimpleDB.
If you like to know how to use the job system step by step, you should read the next parts.
To start a job session, the user has to call awsac-session --start --ini sessionstartinfofile –-archive sessionarchivefile. So, the session start info file and the session archive are needed. This part will explain the meaning and content of these files.
session archive:
This file will be downloaded by each instance within the session. It is intended to contain small, but essential information. It should not be used to distribute big masses of input data. The session archive must include the following:
- awsac-all-instances-autorun
- awsac-processjobs
- job shell script(s)
- job definitions file (explained in the next paragraph)
Since the session archive is an easy way to make small amounts of data available to the instances, it may be convenient to include additional files into the session archive. This can be any script, config file, small data file or anything else small that is e.g. needed in any job shell script.
The archive itself must be a BZ2 compressed tarball. Any other file extension than .tar.bz2 will be declined by awsac-session.
job definitions file:
Until here, you perhaps asked yourself how to define the jobs a job session should process. The solution is the job definitions file. A job is defined by its shell script and the snapshot ID (see Elastic Block Store) containing the ATLAS Software Release Version the job should use. Hence, the data format of one line in the job definitions file is the following:
snapshotID;shellscriptname;numberofjobsThis means that one line can define more than one job. Hence, if you like to run different copies of the same job shell script with the same ATLAS Software Release Version, you only need one line. If you like to define jobs that differ, you have to write more than one line.
Consider, the shell script shellscriptA.sh should run three times using snapshot snap1 and one time using snap2. Additionally, shellscriptB.sh should run two times using snap1, too. The following job definitions file will achieve this:
snap1;shellscriptA.sh;3
snap2;shellscriptA.sh;1
snap1;shellscriptB.sh;2
This file defines six jobs and should result in six simultaneously used virtual cores.
The job definitions file must be named jobs.cfg and placed into the session archive*.
session start information file:
This file contains various information, awsac-session --start needs to start the job session. The information must be placed into an ini-style file. The following format must be matched:
[startinfo]
instance_type =
ami_id =
sessionsbucket =
ec2_uid =
shortdescr =
n_jobs =
- instance_type defines the favoured EC2 instance type type. Currently m1.small and c1.medium are supported. This implicates the number of cores per instance (n_cpi).
- ami_id is the ID of the AWSAC AMI to start up. The AWS account (defined by the credentials Access Key ID and Secret Key) you use with awsac-session must have access to this AMI (e.g. an own or a public AMI).
- sessionbucket is the S3 bucket the session stores its S3 objects in (the session archive, all the result files, ...) Your AWS account needs full access to this bucket.
- ec2_uid is the EC2 User ID the AMI defined in ami_id belongs to. In case of a public AMI, this perhaps is not your UID. awsac-session needs that to check the existence of the AMI.
- shortdescr must be a short (not longer than 8 chars) description of the job session.
- n_jobs defines the number of jobs within the session. Hence, it defines the number of instances n_inst to start. awsac-session will calculate n_inst from n_jobs and n_cpi. As you can see, n_jobs should match the number of jobs defined in jobs.cfg.
This part is a detailed manual for using the job system with awsac-session. Some facts that were already explained before will be repeated.
There are four main tasks: Start sessions (--start commandlineoption), check sessions’ status (--check), get sessions results (--getresults) and clean up used Amazon Web Services S3 and SimpleDB (--cleanup). These different options are now explained in detail.
--start --ini sessionstartinfofile –-archive sessionarchivefile: Starts a session.
awsac-session needs some information about the session to start. This information must be delivered within the session start info and session archive files. How to build the content of these is described in 5.3.1 Build job session information files.
After checking the settings in the session start info file, awsac-session generates a session ID for the new session. It consists of the time, the short description and some randomness (it must be a unique identifier). Then the session archive is uploaded to S3 (to sessionbucket/sessionid/archivefilename). The existence of the given AMI is checked. awsac-session builds a special userdata string (see 4.3.1: userdata string) that will submitted within the RunInstances API call to start up the instances for the session. The string has the following format:
session_id;sessionbucket;archivefilename;cores_per_instanceHence, when instances of an AWSAC AMI receive this string, they know the session ID of the session they belong to and are able to download the session archive from S3. Of course, an instance should know by itself how many cores it has. But by adding n_cpi to the string, it is possible to control the number of jobs per instance from the client system. awsac-processjobs assimilates this information and only starts as many sub processes per instance as given here.
awsac-session checks the existence of a SimpleDB domain with the session ID as its name. If it exists, it will be deleted. All content will get lost. Then awsac-session asks the user, if he really wants to start n_inst instances of the defined type with the constructed userdata string. Choosing y causes awsac-session to send the RunInstances API call. On success, the EC2 reservation ID is displayed.
After this a config file is written. It contains all information about the session and is necessary for awsac-session --check, --getresults and --cleanup. The filename of the config file contains the session ID, leading in unique names of the produced config files. Keeping these configfiles even after --cleanup means keeping information about a session.
Note
After the RunInstances API call mainly two different things can happen: All now automatically following steps result in success or, if there is a problem with e.g. the user data or the archive content, then all instances will fail. Some recommendations:
- always check the instances with Elasticfox. There the states of the instances can be watched (pending or running or already shutting-down). running means that the operating system has started booting.
- use the console output option in Elasticfox. It allows you to see the output of an instance. All server-sided steps should raise errors if something went wrong. These errors can be seen in the console output. The output is not delivered in realtime. There is some delay!
- if there are no instances running at all (AWS credentials in Elasticfox must be the same awsac-session used), then perhaps the RunInstances API call failed. We never observed this behaviour.
--check --config configfile: Checks SimpleDB for the state of a session.
When awsac-processjobs runs with success until starting the jobs as sub processes, then the SimpleDB domain session ID has been created and filled with content. awsac-session gets this information from SimpleDB and prints it to the screen. The output should be self-explanatory.
The EC2 instance state switch from pending to running may last a few minutes. Since the server-sided AWSACtools components start after init from rc.local and then take some seconds for them self, there may decay some minutes from --start until the first job reports something to the SimpleDB domain of the session.
Hence, when awsac-session states that the domain session ID cannot be found some minutes after --start, then this should be okay. A maximum delay of about 4 minutes was experienced. Everything above 5 minutes should raise doubts. If the domain does not exist after ~10 minutes, then something went wrong. Check console output of the instances with Elasticfox.
If a job makes problems (e.g. it is running for a long time and should have finished long ago), then you should use Elasticfox to find out the public DNS name of the instance the problematic job is running on. Use ssh to connect to the instance. Then you have various possibilities to debug the problem. An example of what you can do:
Look in one of the different log files and decide, whether the job should go on or should be killed. If necessary, kill the “/bin/sh shellscript” sub process that makes the problems. Then awsac-processjobs should go on processing the remaining steps until instance shut-down. This would be a clean solution, because other jobs on the same instance are not affected.
--getresults --config configfile --outdir outputdir: Downloads all result files from the sessionbucket.
Started with these parameters, awsac-session connects to S3 and checks if the sessionbucket exists. If it exists, all objects in this bucket beginning with session ID are downloaded to a directory in outputdir with the session ID in its name.
--cleanup --config configfile: Asks you for cleaning S3 and/or SimpleDB.
When all jobs are finished and all result files are downloaded, S3 and SimpleDB should be cleaned up. If you choose to clean S3, then all sessionbucket/sessionid* objects will be deleted. awsac-session informs you about every deleted object. If you choose to clean SimpleDB, then simply the whole SimpleDB domain session ID gets deleted with all its content.
Note
awsac-session uses boto. boto gets the AWS credentials from environment variables. Make sure that the following ones are set when running awsac-session: AWS_ACCESS_KEY_ID, AWS_SECRET_ACCESS_KEY
This example shows the generation of single pions within four jobs on two c1.medium instances. The jobs use ATLAS Software Release 14.2.10, which is prepared in snapshot snap-9fd433f6. Two jobs should produce 30 pions, the other two jobs should produce 1000 pions. The .root files should be returned.
Preparation:
Okay, lets build the job shell scripts, the jobs definitions file, the session archive and the session start information file!
The two different job shell scripts will be named gen_30.sh and gen_1000.sh. Hence, the corresponding job definitions file, jobs.cfg, has the following content:
snap-9fd433f6;gen_30.sh;2
snap-9fd433f6;gen_1000.sh;2
This defines the four desired jobs. The first two will do the same and the last two will do the same, too.
gen_1000.sh is presented here:
echo ATLAS JOB BEGIN: gen 1000 events
echo $(date)
echo ==============================================

source ${ATLASDir}/14.2.10/cmthome/setup.sh -tag=14.2.10
csc_evgen_trf.py 007410 1 1000 765432 ${AWSACworkingDir}/CSC.007410.singlepart_singlepi+_logE.py EVGEN_007410_00001.pool.root > csc_evgen_trf_gen1000.log
echo ==============================================

echo BUNDLE RESULTFILES INTO ARCHIVE
tar cjvf results.tar.bz2 EVGEN_007410_00001.pool.root csc_evgen_trf_gen1000.log
if [ $? -eq 0 ]; then
    echo "bundle successfull"
else
    echo "tar error"
fi

echo ==============================================
echo $(date)
echo ATLAS JOB END: gen 1000 events
exit
This is the content of gen_30.sh (for completeness):
echo ATLAS JOB BEGIN: gen 30 events
echo $(date)
echo ==============================================

source ${ATLASDir}/14.2.10/cmthome/setup.sh -tag=14.2.10
csc_evgen_trf.py 007410 1 30 765432 ${AWSACworkingDir}/CSC.007410.singlepart_singlepi+_logE.py EVGEN_007410_00001.pool.root > csc_evgen_trf_gen30.log
echo ==============================================

echo BUNDLE RESULTFILES INTO ARCHIVE
tar cjvf results.tar.bz2 EVGEN_007410_00001.pool.root csc_evgen_trf_gen30.log
if [ $? -eq 0 ]; then
    echo "bundle successfull"
else
    echo "tar error"
fi

echo ==============================================
echo $(date)
echo ATLAS JOB END: gen 30 events
exit
As you can see, at the beginning of every job shell script that like to use ATLAS Software commands, the ATLAS Software Release must be initialized. Details about this initialization can be found in 7.2 Install and configure ATLAS Software Release.
Details on particle generation will be delivered in CSC.007410.singlepart_singlepi+_logE.py. This file will be stored in the session archive. So it will be accessible from the job shell scripts at runtime!
awsac-autorun sets and uses some environment variables that can be used within the job shell scripts, too. The environment variable AWSACworkingDir contains the directory, where awsac-autorun stores the contents of the session archive; ATLASDir contains the path, where one or more ATLAS Software Release versions are mounted to by awsac-processjobs. The files results.tar.bz2 produced by both of the job shell scripts will be collected and sorted by the job system automatically.
From this it follows that we already have various files for the session archive: gen_1000.sh, gen_30.sh, jobs.cfg and CSC.007410.singlepart_singlepi+_logE.py. Together with awsac-processjobs and awsac-all-instances-autorun the content will be complete. Hence, additionally awsac-processjobs.py and awsac_all_instances_autorun.sh were included (These are the real file names of the programs at the time of creating this example). The files were bundled into a BZ2 compressed tarball sessionarchive.tar.bz2. This may help you to create the archive:
$ cd directory_of_session_archive_files
$ tar cjvf sessionarchive.tar.bz2 *
Additionally, this little Python script may help you with that, too (e.g. convenient on Windows systems):
import tarfile, os

bundledir = "directory_of_session_archive_files"

tar = tarfile.open("sessionarchive.tar.bz2", "w:bz2")
for file in os.listdir(bundledir):
    tar.add(os.path.join(bundledir,file),file)
tar.close()
This is not all information awsac-session needs to start a new job session, yet. The session start info file is still missing: session.ini. In the case of the example, the content of session.ini looks like:
[startinfo]
instance_type = c1.medium
ami_id = ami-c97591a0
sessionsbucket = atlassessions
ec2_uid = 201521871620
shortdescr = eventgen
n_jobs = 4
We want to have «four» jobs within the session and they should run on «c1.medium» instances of the AWSAC AMI «ami-c97591a0»; owned by AWS user «201521871620». awsac-session and awsac-processjobs will work with the bucket «atlassessions». This example session is called «eventgen».
Start session:
Ready to go! Type
$ ./awsac-session.py --start -i session.ini -a sessionarchive.tar.bz2The output should look like
::::>  AWSACtools session management v08-10-13
::::>  by Jan-Philip Gehrcke


# starting new session; parsing start information file...

[startinfo]
sessionsbucket = atlassessions
ami_id = ami-c97591a0
shortdescr = eventgen
ec2_uid = 201521871620
instance_type = c1.medium
n_jobs = 4

# ----- shortdescription of new session: EVENTGEN -----

# instancetype chosen: `c1.medium` with 2 core(s) per instance. With 4 demanded job(s)/core(s) this makes 2 instance(s) we have to start. Unused cores: 0.

# generating session ID from date, shortdescription, randomness:
081215_1646--eventgen--1816

# uploading sessionarchive file to S3...
uploaded to S3 as object (bucket:`atlassessions` key:`081215_1646--eventgen--1816/sessionarchive.tar.bz2`).

# connecting to EC2 to check your AMI-ID...
found AMI `ami-c97591a0` (ATLAS/SL47-AWSAC-v03-boto957.manifest.xml)

# building user-data string to be submitted to all instances...
081215_1646--eventgen--1816;atlassessions;sessionarchive.tar.bz2;2
(session_id;bucket;sessionarchivename;cores_per_instance)

# checking SimpleDB domain for this session...
  domain does not exist: 081215_1646--eventgen--1816

# In the next step EC2 will be instructed to run exactly 2 instance(s) of given AMI (type `c1.medium`) with user-data mentioned obove.
proceed? (y/n):
If you now choose y, awsac-session goes on and the EC2 reservation will be requested. The output then looks like:
Request accepted. EC2 reservation ID: r-bc0da0d5
# saving session to file... session-081215_1646--eventgen--1816.cfg
As you can see, a new file was created: session-081215_1646--eventgen--1816.cfg.
Monitor session:
Use Elasticfox and awsac-session --check to follow the sessions process. Watch the instances pending...

...and starting...:

After some time, you can see new attached EBS volumes of the desired snapshot listed:

This indicates that the chain of commands was successful until awsac-processjobs. Hence, there already should be some monitoring information:
$ ./awsac-session.py --check -c session-081215_1646--eventgen--1816.cfgThe output is the follwing:
::::>  AWSACtools session management v08-10-13
::::>  by Jan-Philip Gehrcke


[sessionconfig]
n_jobs = 4
cores_per_instance = 2
shortdescr = eventgen
bucket = atlassessions
session_id = 081215_1646--eventgen--1816
ec2_reservation_id = r-bc0da0d5
instance_type = c1.medium
unused_cores = 0
n_instances = 2
ec2_uid = 201521871620
ami_id = ami-c97591a0
runuserdata = 081215_1646--eventgen--1816;atlassessions;sessionarchive.tar.bz2;2

============= Job 1 (status: finished) ==============
running /mnt/awsac/gen_30.sh on instance i-33f64f5a with launchindex 0
started running: 08-12-15 16:49:03
ended running: 08-12-15 16:50
returncode: 0
started saving: 08-12-15 16:50:33
ended saving: 08-12-15 16:50:39

============= Job 2 (status: saving) ==============
running /mnt/awsac/gen_30.sh on instance i-33f64f5a with launchindex 0
started running: 08-12-15 16:49:08
ended running: 08-12-15 16:50
returncode: 0
started saving: 08-12-15 16:50:51

============= Job 3 (status: running) ==============
running /mnt/awsac/gen_1000.sh on instance i-32f64f5b with launchindex 1
started running: 08-12-15 16:49:39

============= Job 4 (status: running) ==============
running /mnt/awsac/gen_1000.sh on instance i-32f64f5b with launchindex 1
started running: 08-12-15 16:49:44
The jobs with 30 event generations are a bit faster than the ones generating 1000 events.
When the jobs are over, then the EBS volumes should be listed as deleting or deleted:

Of course, ./awsac-session.py --check -c session-081215_1646--eventgen--1816.cfg now confirms that all jobs are finished.
Get results:
Lets download the content of the sessionbucket:
$ mkdir sessionresults
$ ./awsac-session.py --getresults -c session-081215_1646--eventgen--1816.cfg -o sessionresults
The output is the following:
::::>  AWSACtools session management v08-10-13
::::>  by Jan-Philip Gehrcke


[sessionconfig]
n_jobs = 4
cores_per_instance = 2
shortdescr = eventgen
bucket = atlassessions
session_id = 081215_1646--eventgen--1816
ec2_reservation_id = r-bc0da0d5
instance_type = c1.medium
unused_cores = 0
n_instances = 2
ec2_uid = 201521871620
ami_id = ami-c97591a0
runuserdata = 081215_1646--eventgen--1816;atlassessions;sessionarchive.tar.bz2;2

outputfolder created: /home/iwsatlas1/gehrcke/dokusession/sessionresults/session-081215_1646--eventgen--1816
saved processjobslog_LI_0.tar.bz2
saved processjobslog_LI_1.tar.bz2
saved results_job_1.tar.bz2
saved results_job_2.tar.bz2
saved results_job_3.tar.bz2
saved results_job_4.tar.bz2
saved sessionarchive.tar.bz2
saved stdouterr_job_1.tar.bz2
saved stdouterr_job_2.tar.bz2
saved stdouterr_job_3.tar.bz2
saved stdouterr_job_4.tar.bz2
The numbering of the jobs follows the order of the definitions in the job definitions file jobs.cfg. The awsac-processjobs log exists for each instance within the session; labelled with the launch index (LI) in the file names. All the extracted result- and log archives above can be found here: http://gehrcke.de/awsac/permstuff/example_session/results
Warning
Since the ATLAS Software prints the current environment, the environment variables AWS_ACCESS_KEY_ID and AWS_SECRET_ACCESS_KEY are sent to stdout, too. These keys were removed from the log files.
Clean up:
The monitoring information on SimpleDB is no longer needed and the results and logs were downloaded from S3.
$ ./awsac-session.py --cleanup -c session-081215_1646--eventgen--1816.cfgConfirm to delete the contents. Then the output looks like:
::::>  AWSACtools session management v08-10-13
::::>  by Jan-Philip Gehrcke


[sessionconfig]
n_jobs = 4
cores_per_instance = 2
shortdescr = eventgen
bucket = atlassessions
session_id = 081215_1646--eventgen--1816
ec2_reservation_id = r-bc0da0d5
instance_type = c1.medium
unused_cores = 0
n_instances = 2
ec2_uid = 201521871620
ami_id = ami-c97591a0
runuserdata = 081215_1646--eventgen--1816;atlassessions;sessionarchive.tar.bz2;2

delete SimpleDB-domain 081215_1646--eventgen--1816? y/n: y
  domain existed and was deleted: 081215_1646--eventgen--1816
delete S3-objects atlassessions/081215_1646--eventgen--1816/* ? y/n: y
deleted processjobslog_LI_0.tar.bz2
deleted processjobslog_LI_1.tar.bz2
deleted results_job_1.tar.bz2
deleted results_job_2.tar.bz2
deleted results_job_3.tar.bz2
deleted results_job_4.tar.bz2
deleted sessionarchive.tar.bz2
deleted stdouterr_job_1.tar.bz2
deleted stdouterr_job_2.tar.bz2
deleted stdouterr_job_3.tar.bz2
deleted stdouterr_job_4.tar.bz2
This part has the intention to make the job system more comprehensible by means of the console output (the log) of an instance within the job session above. The console output logfiles of both instances within the example session can be found here: http://gehrcke.de/awsac/permstuff/example_session/consoleoutput
Now let the console output of the instance with launch index 0 explain the job system step by step.
At first the instance starts up:
Linux version 2.6.16-xenU [...]
[...]
INIT: Entering runlevel: 4
[...]
Starting HAL daemon: [  OK  ]
When INIT finishes, awsac-autorun starts up (invoked by rc.local):
***********************************************************
  AWSACtools: autorun (Individual Instance Startup System)
    /root/awsac/awsac-autorun.sh invoked from rc.local
                  by Jan-Philip Gehrcke
                      v08-10-13
***********************************************************
# setting up environment variables...
ATLASDir: /mnt/atlas
ATLASworkingDir: /mnt/atlasworkarea
AWSACworkingDir: /mnt/awsac
SessionInfoDir: /mnt/awsac/sessioninfo
SessionInfoFile: /mnt/awsac/sessioninfo/awsac.sessinfo
SessionArchiveFile: /mnt/awsac/sessionarchive.tar.bz2
AWSACAutostartFile: /mnt/awsac/awsac_all_instances_autorun.sh
# creating directories for AWSAC and ATLAS-Software in /mnt...
creating AWSACworkingDir
creating SessionInfoDir
creating ATLASDir
creating ATLASworkingDir
After creating directories and environment variables, awsac-autorun tries to receive the userdata string:
# getting user-data (should contain the sessioninfostring)...
--16:48:41--  http://169.254.169.254/latest/user-data
           => `/mnt/awsac/sessioninfo/awsac.sessinfo'
Connecting to 169.254.169.254:80... connected.
HTTP request sent, awaiting response... 200 OK
Length: 66 [application/octet-stream]
 0% [                                     ] 0             --.--K/s             100%[====================================>] 66            --.--K/s
16:48:41 (8.99 MB/s) - `/mnt/awsac/sessioninfo/awsac.sessinfo' saved [66/66]
On success, the Python script getsessionarchive uses the string information to download the session archive:
# setting AWSenvironment variables...
# running getsessionarchive -i /mnt/awsac/sessioninfo/awsac.sessinfo -o /mnt/awsac/sessionarchive.tar.bz2
# to get sessionarchive from S3 bucket...
getsessionarchive.py: downloaded 081215_1646--eventgen--1816/sessionarchive.tar.bz2 from bucket atlassessions to /mnt/awsac/sessionarchive.tar.bz2
# untaring sessionarchive...
awsac-processjobs.py
awsac_all_instances_autorun.sh
CSC.007410.singlepart_singlepi+_logE.py
gen_1000.sh
gen_30.sh
jobs.cfg
# trying to execute AWSAC autostart shellscript...
After extracting the archive, awsac-all-instances-autorun is executed:
******* awsac_all_instances_autorun.sh *******
*******           v08-12-14            *******
# getting instance-id (from meta-data server)...
--16:48:42--  http://169.254.169.254/latest/meta-data/instance-id
           => `/mnt/awsac/sessioninfo/InstanceID'
Connecting to 169.254.169.254:80... connected.
HTTP request sent, awaiting response... 200 OK
Length: 10 [text/plain]
 0% [                                     ] 0             --.--K/s             100%[====================================>] 10            --.--K/s
16:48:42 (1.59 MB/s) - `/mnt/awsac/sessioninfo/InstanceID' saved [10/10]
instance id: i-33f64f5a
running /opt/bin/python /mnt/awsac/awsac-processjobs.py --sessioninfofile /mnt/awsac/sessioninfo/awsac.sessinfo --jobsfile /mnt/awsac/jobs.cfg --instanceID i-33f64f5a
It received the instance ID and initializes awsac-processjobs with the proper session info and job definitions files. awsac-processjobs starts up.
****** processjobs.py start Mon Dec 15 16:48:42 2008 ******
# parsing the sessioninfofile /mnt/awsac/sessioninfo/awsac.sessinfo ...
  Session ID: 081215_1646--eventgen--1816 ;  CoresPerInstance: 2
# getting information about this instance from EC2...
  the ami-launch-index of this instance (i-33f64f5a) is 0
  the Availability Zone of this instance is us-east-1b
# parsing the jobsconfigfile /mnt/awsac/jobs.cfg ...
# jobsdatadicts_list read from /mnt/awsac/jobs.cfg
# my job numbers are: [1, 2]
[{'jobnr': '1', 'snap_id': 'snap-9fd433f6', 'shscript': '/mnt/awsac/gen_30.sh'}, {'jobnr': '2', 'snap_id': 'snap-9fd433f6', 'shscript': '/mnt/awsac/gen_30.sh'}]
# prepare the creation of EBS volume(s) from the needed ATLAS Release snapshot(s)...
  detected following different snap_ids: ['snap-9fd433f6']
  planing to assign snap_id(s) to following device(s):
  snap-9fd433f6->/dev/sdh1
awsac-processjobs identified the jobs it has to run (from jobs.cfg and the launch index). It built a list of needed snapshots for EBS volumes and assigned corresponding devices. The EBS Volume(s) will be mounted in the same availability zone as the instance.
# create EBS volume(s)...
  instructed EC2 to create EBS from snapshot snap-9fd433f6
  status: creating
  status: available
# attach EBS volume(s)...
  instructed EC2 to attach volume vol-92e400fb to /dev/sdh1
  status: attaching
  status: attached
# mount EBS volume(s)...
  invoke mounting: subprocess.Popen() with args ['mount', '/dev/sdh1', '/mnt/atlas']
  mount subprocess ended. returncode: 0
# this is the list of successfully mounted EBS - snapshots:
  ['snap-9fd433f6']
# the following jobs now have their desired EBS running in system:
[{'jobnr': '1', 'snap_id': 'snap-9fd433f6', 'shscript': '/mnt/awsac/gen_30.sh'}, {'jobnr': '2', 'snap_id': 'snap-9fd433f6', 'shscript': '/mnt/awsac/gen_30.sh'}]
awsac-processjobs has guaranteed a successfully mounted snapshot for its jobs 1 and 2 (for all jobs it has to run). So the jobs can start working.
# initialize running jobs...
  creating SimpleDB jobitems...
# preparing job 1...
  cwd for job: /mnt/atlasworkarea/1  (created)
  calling subprocess.Popen() with args: ['/bin/sh', '/mnt/awsac/gen_30.sh']
  runstart: updating sDB item job1
# preparing job 2...
  cwd for job: /mnt/atlasworkarea/2  (created)
  calling subprocess.Popen() with args: ['/bin/sh', '/mnt/awsac/gen_30.sh']
  runstart: updating sDB item job2
# wait for subprocesses to finish...
The job shell script subprocesses are started and the first monitoring information is written to SimpleDB. awsac-processjobs now is within a waiting loop.
# subprocess for job 1 ended.  returncode: 0
  runend: updating sDB item job1
  savestart: updating sDB item job1
  found /mnt/atlasworkarea/1/results.tar.bz2 (47507 Byte)
08-12-15 16:50:34:  start upload. bucket:atlassessions; key:081215_1646--eventgen--1816/results_job_1.tar.bz2
08-12-15 16:50:34:  finished.
  outputfile of job 1 found: /mnt/atlasworkarea/1/stdouterr_job_1.log
  bundled /mnt/atlasworkarea/1/stdouterr_job_1.log to /mnt/atlasworkarea/1/stdouterr_job_1.tar.bz2
  planing to upload /mnt/atlasworkarea/1/stdouterr_job_1.tar.bz2 (314 Byte)...
08-12-15 16:50:34:  start upload. bucket:atlassessions; key:081215_1646--eventgen--1816/stdouterr_job_1.tar.bz2
08-12-15 16:50:34:  finished.
  saveend: updating sDB item job1
The first job finished. Monitoring information is updated. Result and log (compressed) is saved to S3.
# subprocess for job 2 ended.  returncode: 0
  runend: updating sDB item job2
  savestart: updating sDB item job2
  found /mnt/atlasworkarea/2/results.tar.bz2 (47574 Byte)
08-12-15 16:50:51:  start upload. bucket:atlassessions; key:081215_1646--eventgen--1816/results_job_2.tar.bz2
08-12-15 16:50:51:  finished.
  outputfile of job 2 found: /mnt/atlasworkarea/2/stdouterr_job_2.log
  bundled /mnt/atlasworkarea/2/stdouterr_job_2.log to /mnt/atlasworkarea/2/stdouterr_job_2.tar.bz2
  planing to upload /mnt/atlasworkarea/2/stdouterr_job_2.tar.bz2 (314 Byte)...
08-12-15 16:50:51:  start upload. bucket:atlassessions; key:081215_1646--eventgen--1816/stdouterr_job_2.tar.bz2
08-12-15 16:50:52:  finished.
  saveend: updating sDB item job2
The same with the second job. No more jobs left to wait for.
# all subprocesses ended
# summary:
Jobnumber: 1
starttime: 08-12-15 16:48:56
endtime: 08-12-15 16:50
executiontime: 00:01
returncode: 0
----------------------
Jobnumber: 2
starttime: 08-12-15 16:49:03
endtime: 08-12-15 16:50
executiontime: 00:01
returncode: 0
----------------------
This little summary informs about the finished sub processes. awsac-processjobs successfully ran the jobs. Now it has to clean up!
# unmount EBS volume(s)...
  invoke unmounting: subprocess.Popen() with args ['umount', '/dev/sdh1']
  umount subprocess ended. returncode: 0
# detach EBS volume(s)...
  instructed EC2 to detach volume vol-92e400fb
  status: detaching
  status: available
# delete EBS volume(s)...
  instructed EC2 to delete volume vol-92e400fb
  status: True
# close processjobs-logfile...
  it will then be bundled and uploaded. then EC2 will be instructed to terminate this instance
  bundled processjobs.log to processjobslog_LI_0.tar.bz2
08-12-15 16:51:02:  start upload. bucket:atlassessions; key:081215_1646--eventgen--1816/processjobslog_LI_0.tar.bz2
08-12-15 16:51:02:  finished.
# instructing EC2 to terminate my instance..
As you can see, awsac-processjobs leaves nothing on EC2. The last few lines can not be seen in processjobs.log. In the following last part of the console output, you can see the shut-down of the instance:
c
Scientific Linux SL release 4.7 (Beryllium)
Kernel 2.6.16-xenU on an i686
domU-12-31-39-01-C9-53 login: INIT: Switching to runlevel: 0
INIT: Sending processes the TERM signal
[...]
Halting system...
md: stopping all md devices.
md: md0 switched to read-only mode.
System halted.
This instance had a successful run within its job session and terminated itself successfully!